


Flounder Kandinsky
- Steps
- Ingredients
Ingredients
Macadamia Tahini
Harissa
Scallop Mousse
Harissa (contd.)
Flounder
Grilled Zucchini Garnish
Macadamia Tahini (Contd.)
Preserved Lemon Yoghurt
Green Zucchini Purée
Squash Purée
Select All
Steps
- Preheat hibachi grill.
- Preheat the underbench oven to 175°C, full fan.
- Preheat combi oven to 85°C steam, fan level 4.
- Place a Thermomix jug in the freezer until required.
Scallop Mousse Preparation
- Bring a small saucepan of water to the boil.
Macadamia Tahini
- Place raw macadamia onto a baking tray and place in oven
- Roast the macadamia nuts until evenly amber brown, approximately 20 minutes, stirring every 4 minutes. It’s vital that they are roasted dark enough but not burnt.
- Remove from oven and set aside at room temperature.
Harissa
- Brush the whole capsicums with a small amount of olive oil before grilling.
- Char over high heat on the hibachi until completely black all the way around.
- Place into a medium saucepan, cover with a fitted lid and set aside until cool.
Scallop Mousse
- Weigh out all ingredients and make sure they are all well chilled before starting to make the mousse.
- Set up the Thermomix and remove the thermo jug from the freezer. Add scallops with a pinch of salt and blend on speed 5 to a fine paste, for 2 minutes.
- Using a spatula scrape down the sides and ensure the scallops are evenly blended to a well incorporated paste-like consistency then return to speed 7.
- Add the egg whites gradually through the hole in the lid, ensuring it is well incorporated before adding the next quantity.
- Increase the speed slightly and commence adding a stream of cream into the thermomix. Continue to add until all cream is incorporated and the mix looks rich and bone white.
- Remove the jug from the base and scrape the mixture out into a bowl set over a bowl of ice so the mousse can chill.
- Add diced preserved lemon, chives, nutmeg and pepper.
- Spoon a small amount in to the saucepan of boiling water to poach. Cook for two minutes, then remove and taste. Adjust seasonings and modify texture, if necessary.
- Once happy with the mousse, transfer to a piping bag and place in the fridge to thoroughly chill.
Harissa (contd.)
- Once cooled, peel the capsicum thoroughly, remove seeds, stem and water within. Roughly chop the flesh.
- Peel and finely slice the brown onions and garlic cloves.
- Set a medium non-stick frypan over medium heat and add the grapeseed oil to the pan.
- Once the oil has heated to a light haze, proceed to add the onions and garlic to the pan. Sweat down until tender, approximately 10 minutes, ensuring the onions take minimal colour.
- Add the peeled capsicums to the pan and continue cooking over a medium heat for further 15 minutes to remove the moisture from the peppers. Continue to stir the peppers and onions as they are high in sugars that will burn easily.
- Add the palm sugar, pepper, coriander, fennel and chilli to the pan until the spices are thoroughly cooked and the palm sugar has begun to caramelise, approximately 10 minutes.
- Keep scraping the pan so it doesn't burn at this stage. All the qualities and depths of the harissa are built at this stage of the cooking.
- Remove the fry pan from the heat and scoop the mix into a ninja blender, season with the fish sauce and blend, scraping the sides with the scraping crank as you go.
- Once blended, return the harissa back to the stove in a clean non-stick frypan over medium heat to cook out & concentrate further approx 7-8 minutes. Stand with the harissa at this stage and stir constantly to avoid catching. The finished result will be a deep red paste like consistency.
- Cool and store at room temperature in a squeeze bottle fitted with a nozzle ready for plating.
Flounder
- Bring a large saucepan 2/3 full of water to the boil.
- Using a sharp pair of scissors, trim the tail and the fin from around the flounder, leaving all flesh intact.
- Position the flounder dark side up on a board in front of you with the head end at 12 O'clock, tail closest to you at six and the belly of the fish at 3 O'clock.
- Using a sharp boning knife, draw the blade down the centre line of the fish from head to tail to mark the middle of the fish.
- Angling the blade more acutely into the initial central cut, heading towards the belly at 3 O’clock, start to sweep the blade over the frame of the fish and stop short of completely removing the belly.
- Turn the fish over to the white side and repeat the exact same cut again stopping short of completely removing the belly.
- Then, folding the belly pieces together with the skin side in, use a pair of scissors to cut along the cartilage holding the two bellies in place from the tail end of the fish up, away from the rest of the frame.
- By doing this you will achieve the two bellies removed off the frame of the fish but still connected by a neat line of cartilage down the centre.
- Shave down along the inside remaining bone to neaten whilst carefully keeping the two bellies joined. Trim across any excess skin, neatening the belly piece.
- To achieve the rack, start by removing the head. Making neat cuts on either side, being careful not to lose any flesh from the fillet.
- At the tail of the fish a small 2cm fillet can be removed from both sides of the fish exposing the tail bone of the fish which can be trimmed with scissors to create a frenched bone.
- Using a pair of scissors, trim the hard cartilage of the flounder on the exposed belly side of the fish that once held the belly in place. This will help expose the fine rib bones. Snip between each rib bone of the flounder so that they can be cleaned and made ready for the finishing detail.
- Make a neat cut to trim back the edge of the rack where the head was, frenching the centre bone to finish.
- Dip only the exposed flounder bones into the saucepan of boiling water. It is critical the flounder flesh is not exposed to hot water as it will change the texture.
- Using a small square of paper towel, carefully rub off the cooked flesh from the bones leaving behind perfectly frenched fish bones. If any flesh remains, repeat the process again until completely clean.
- Make a neat cut near the first or second rib bone to separate the rack into 2 pieces (approximately 2/3 tail to 1/3 cutlet). You will use 1 well detailed piece for plating.
- Set aside the flounder rack on a tray in the fridge until required.
- To finish the belly, lay the belly out on a cutting board skin side down. On one side of the flounder belly proceed to pipe out enough scallop mousse to completely cover the flesh creating an equal size layer to the flesh. If there is a large gap of skin without flesh, use the scallop mousse to pad out the layer of flesh so that there is 3 equal sized layers. Fold the other fillet over the mousse and pat down to ensure the two fillets are sandwiched together neatly by the mousse.
- Wrap the belly tightly in cling film to create a neat shape, place on a baking tray and chill in the fridge until required.
Grilled Zucchini Garnish
- With a sharp knife, split a small zucchini in half lengthways.
- Score deeply in a diamond pattern without breaking through the skin.
- Place a medium non-stick frypan on high heat.
- Brush zucchini with oil, season with salt and place cut side down into the frypan. Weigh down initially with a small cast iron frypan and sear for approximately 2-3 minutes until a golden brown colour, moving around in the pan to ensure even colour. Zucchini will be finished on the hibachi.
- Set aside on a tray at room temperature until required.
Macadamia Tahini (Contd.)
- Once roasted, place macadamia in a Thermomix jug and blend on speed 3.5 until the oils are released from the nut, approximately 3-4 minutes, then blend on speed 10 for 10 minutes until smooth.
- Pass through a fine chinois into a bowl and season with salt and sugar.
- Place over ice to chill for 15 minutes. Then store in a squeeze bottle at room temperature for plating.
Preserved Lemon Yoghurt
- Place yoghurt into a medium bowl. Gradually add the preserved lemon purée in stages, tasting as you go to ensure the final product is balanced and not too salty or bitter.
- Store the finished yoghurt in a squeeze bottle at room temperature for plating.
Green Zucchini Purée
- Remove and discard the seedy inside from the zucchini, then finely slice the remaining skin and flesh.
- Finely slice the garlic.
- Place a large, wide based frypan onto a medium high heat.
- Add the grapeseed oil and heat until the pan reaches a light haze.
- Add the sliced zucchini and garlic to the pan in a single layer and cover immediately with a fitted lid.
- Cook with the lid on for approximately 60 seconds until the zucchini is just cooked, then remove. The zucchini and garlic must be tender before removing from the pan to blend.
- Season to taste with salt flakes.
- Blend the zucchini, garlic and the fresh basil on the Purée setting in blender for 4 minutes.
- Whilst blending, add the olive oil to the purée along with a pinch of xanthan for at least 30 seconds.
- If you find the vegetables aren’t blending efficiently then add a cube of ice to aid in achieving a bright green silky purée.
- Chill over ice, then pass through a fine chinois and funnel into a squeeze bottle at room temperature for plating.
Squash Purée
- Place a large, wide based frypan onto a medium high heat.
- Remove and discard all the seeds from the squash, then finely slice the remaining skin and flesh. Finely slice the garlic.
- Add the grapeseed oil and heat until the pan reaches a light haze.
- Add the sliced squash, garlic and curry powder to the pan in a single layer and cover immediately with a fitted lid.
- Cook with the lid on for approximately 60 seconds until the squash is just cooked, then remove. The squash and garlic must be tender before removing from the pan to blend.
- Season to taste with salt flakes.
- Blend the squash and garlic on the Purée setting in blender for 4 minutes.
- Whilst blending add the olive oil to the purée along with the xanthan gum. The xanthan must be blended for a minimum of 30 seconds to properly hydrate.
- If you find the vegetables aren’t blending efficiently then add a cube of ice to aid in achieving a silky purée like consistency.
- Chill over ice, then pass through a fine chinois and funnel into a squeeze bottle at room temperature for plating.
- Set up bench area for plating Flounder Kandinsky
- olive oil, for brushing
- white alyssum flowers
- Clear bench space and set up heat lamp for plating.
- Place serving plate under heat lamp to warm.
- Set up a clean mini gastro tub with olive oil and pastry brush for plating.
- Pick white alyssum flowers and set aside in a container with a lid for plating.
Flounder and Zucchini Garnish (contd.)
Flounder belly
Flounder rack
grapeseed oil, for brushing
salt flakes, to season
Zucchini garnish
lime, to juice
fish sauce, to season
olive oil, for brushing
- Place the cling wrapped belly into the combi oven. Steam to an internal temperature of 46°C, approximately 6 minutes.
- Meanwhile, brush the flounder rack with a little grapeseed oil and salt flakes on both sides.
- Grill the rack over a medium heat on the hibachi. The aim is to not create deep brown colouring but to toast the skin lightly and cook the flounder on both sides to ensure the heat reaches the bone. Turn and baste with extra grapeseed oil as required, ensuring you do not tear the skin.
- The flounder rack will take approximately 4 minutes on each side and need to hit approximately 45°C at its thickest part to ensure adequate doneness.
- Grill the zucchini garnish scored side down over the hibachi for approximately 2-3 minutes or until charred, smokey and tender.
- Remove the flounder belly from the steam oven. Remove the cling film then rest for approximately 2 minutes.
- Using a sharp knife, trim the mousse filled belly to create a 5cm piece for plating.
- Brush with olive oil and set aside on a service tray at room temperature for plating.
- Remove the zucchini garnish from the grill. Dress with a squeeze of lime and fish sauce to taste. Portion into an approximately 7cm piece and set aside on a service tray at room temperature for plating.
- Remove the flounder rack from the grill and rest for approximately 2-3 minutes. Reserve 1 piece for plating.
- Brush the finished rack with a little olive oil and set aside on a service tray at room temperature for plating.
Kandinsky Garnish Assembly
7cm Hibachi grilled zucchini piece - 1
Macadamia Tahini, in a squeeze bottle, at room temperature
Preserved Lemon Yoghurt in a squeeze bottle, at room temperature
Green Zucchini Purée in a squeeze bottle, at room temperature
Yellow Squash Purée in a squeeze bottle, at room temperature
Harissa in a squeeze bottle, at room temperature
Hibachi grilled flounder rack piece - 1
5cm Steamed flounder belly piece - 1
Picked white alyssum flowers
Warm serving plate.
- Cover the perimeter of the Grilled Zucchini with the white alyssum flowers.
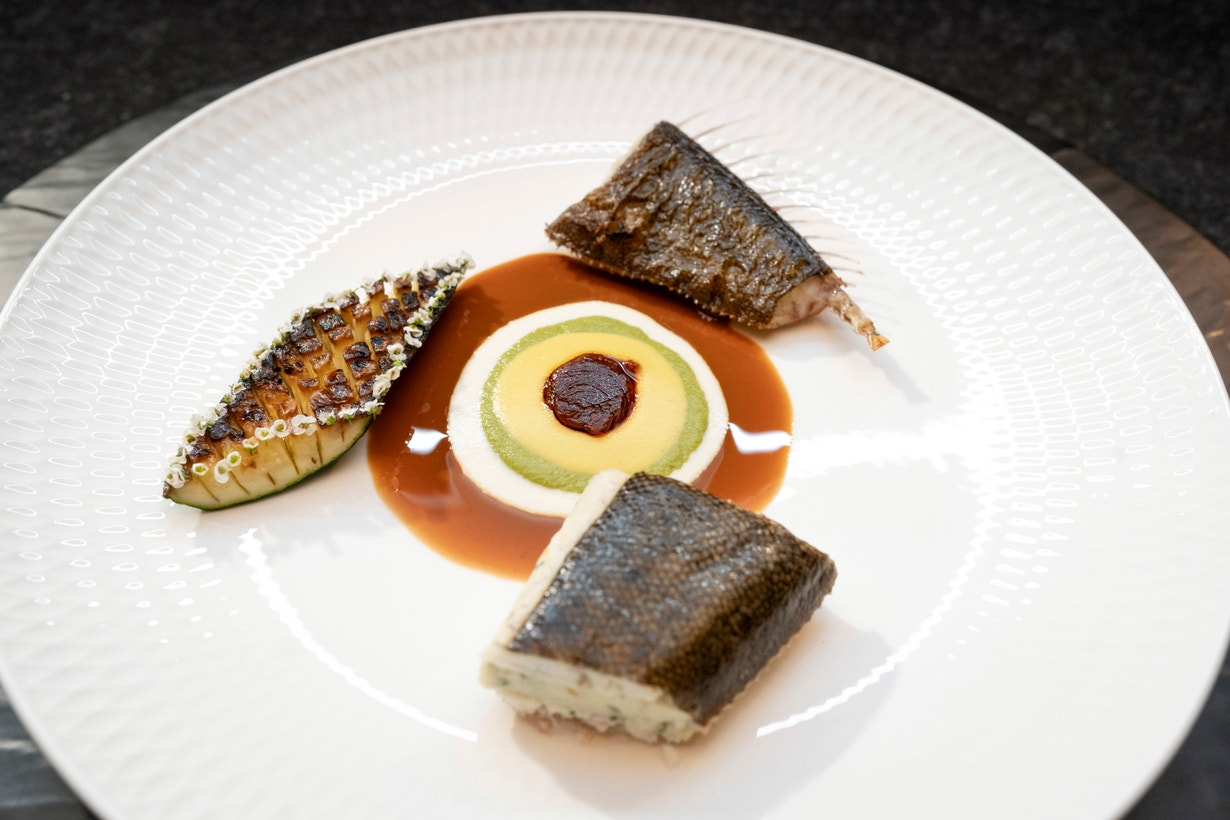
- With the purées, your aim is to create Kandinsky style concentric circles in the middle of the serving plate.
- First place a 50c coin sized circle of Macadamia Tahini in the centre of the warmed plate.
- Next add the Preserved Lemon Yoghurt directly on top. Ensure a neat circle comes from the bottle and you do not add more than the macadamia.
- Follow with the Green Zucchini Purée in the same way then the Yellow Squash Purée, followed by the Harissa.
- Once all purées are down, pick the plate up and using your free hand, tap the base of the plate to allow the purées to flatten slightly and so the circles of sauce become more defined.
- Brush the flounder pieces with oil and season with salt flakes.
- Once the purées are in position, place one piece of Rack at 2 O’clock, Belly at 6 O’clock and Grilled Zucchini at 10 O’clock around and just touching the outer circle of sauces on the plate.