


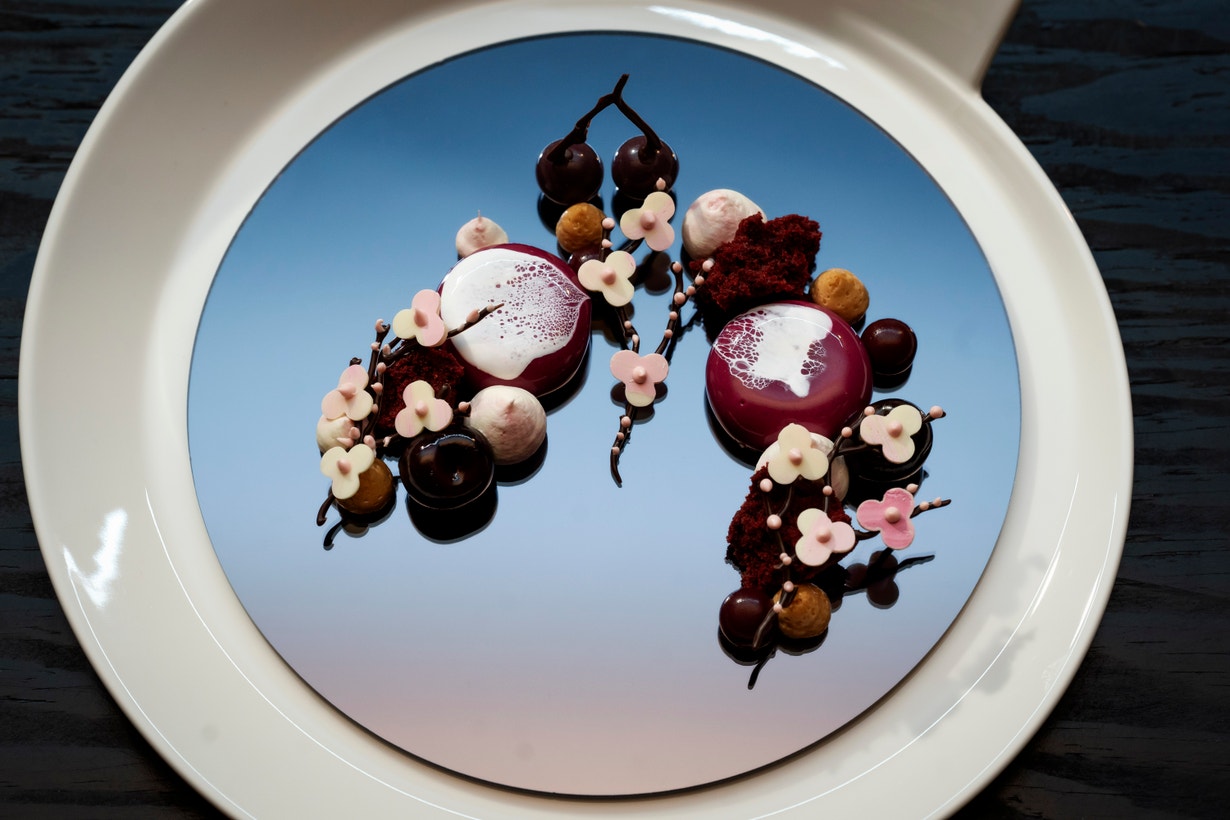
Cherry Blossom
- Steps
- Ingredients
Ingredients
Red Velvet Brownie
Cherry White Chocolate Spray
Chocolate “Cherries” & Chocolate Cherry Blossom Branches
White Chocolate Cherry Blossoms
Chocolate Cherry Blossom Branches
Cherry Blossom Liquid Centres
Vanilla Cheesecake
Purple Glaze
White Chocolate & Cherry Blossom Cream
Cherry Jelly Spheres
Cherries In Vanilla Syrup
Miso Caramel
White Spider Glaze
Vanilla Cheesecake with Cherry Blossom Liquid Centre (continued)
White Choc & Cherry Blossom Cream Cont
Select All
Steps
- Set blast freezer to -40°C.
- Set combi oven to 160°C fan-forced.
Prepare boards
- Place two acetate-lined marble boards (with cherry branch and cherry stem templates) in fridge to cool until required.
Red Velvet Brownie
- In a stand mixer fitted with the butterfly whisk attachment, cream the butter, sugar and salt until pale and smooth.
- In a small heatproof plastic bowl, microwave to melt the chocolate in 30 second increments.
- Grease a small 12.5cm x 6.5cm rectangular baking tin and line with baking paper.
- Add the melted chocolate to the mixer and beat to combine.
- Gradually add the eggs and beat to combine.
- Add the red colour and mix through until evenly incorporated.
- Sieve flour with cocoa powder.
- Remove bowl from mixer and using a spatula, fold in the flour.
- Pour 200g of mix into prepared tin. Tap on bench to level.
- Bake in combi oven for approximately 22-25 minutes.
- Leave to cool in tin, then break into 2.5-3cm irregular pieces and reserve in a takeaway container for plating.
Cherry White Chocolate Spray
- Place the chocolate in a microwave-safe bowl and microwaving in 15 - 30 second intervals, melt until 50% of the chocolate is melted. Work the chocolate with the spatula until smooth and shiny, and the temperature has reduced to 35°C.
- Separately, in a small saucepan over medium heat, melt the cocoa butter, to a temperature of 40°C. Pour the cocoa butter into the melted chocolate and mix to disperse.
- Place the melted liquids into a stick blender cannister, add the mulberry colour and blend until achieving a homogenous colour. The spray needs to be applied at a cooled temperature of 32°C.
- Pour the solution into a measuring jug.
- For the Chocolate Cherries, select the polycarbonate chocolate mould with hemisphere cavities of 2 cm in diameter.
- Remove the airbrush gun and cannister from the dehydrator. Attach the canister to the gun and fill the cannister to ¾ capacity, then fit the lid. Working quickly, transfer spray gun and chocolate mould to the chocolate spray station and test the distribution.
- Spray to lightly cover the inside of at least 8 cavities with the cherry white chocolate spray and then tip the mould upside down to ensure any excess is drained.
- Once set, use a metal scraper to scrape the moulds clean. Set aside at room temperature.
Chocolate “Cherries” & Chocolate Cherry Blossom Branches
- To temper the dark chocolate, place dark chocolate into a large microwave safe plastic bowl. Place in the microwave and microwaving in 30 second intervals, melt until 50% of the chocolate is melted. Work the chocolate with the spatula until smooth and shiny, and the temperature has reduced to 35°C. Transfer into a measuring jug to cool further.
- When the temperature is 31-32 °C fill the cavities with dark chocolate into the cherry white chocolate sprayed cavities and bang on the bench to tap out the air bubbles.
- Turn the mould upside down over chocolate bowl and drip out out the excess chocolate, tapping the sides of the mould with the handle of a large metal scraper until the chocolate starts to set and the drips slow. Whilst still upside down, using a large metal scraper, scrape along the top of the mould to clean the surface. Reserve the remaining chocolate for the Chocolate Cherry Blossom Branches.
- Still upside down, slap the mould down onto the bench and leave the chocolates to set at room temperature for 10 minutes, then place in the fridge to help set further for 30 minutes.
- Meanwhile, using a heat gun if necessary, at a temperature of 31-32 °C, pour a small amount of warmed chocolate into two baking paper cones and fold over the end multiple times to seal.
- Place one chocolate filled paper cone in the dehydrator for later use.
- Remove the marble board with the cherry blossom branches template from the fridge. Cut the tip off one piping bag 3mm in diameter and pipe at least 3, approximately 5cm three pronged cherry blossom branches over the template. Return the board to the fridge to set.
- Remove the other marble board with template of cherry stems from the fridge. Pipe at least 3, approximately 3cm double cherry stems onto the acetate. Return the board to the fridge to set.
- Line a small pizza tray with baking paper. Once the Chocolate Cherries have set they should appear slightly frosted. Demould the halves by gently tapping on the bench. Set aside on the tray at room temperature.
White Chocolate Cherry Blossoms
- Place the chocolate in a microwave safe bowl and microwaving in 15-30 second intervals, melt until 50% of the chocolate is melted. Work the chocolate with the spatula until smooth and shiny, and the temperature has reduced to 28-29°C.
- Add the pink colour and mix until the colour is homogenous.
- Using a heat gun and stirring if necessary, ensure the chocolate is at a temperature of 29-30°C. Pour a small amount into a baking paper cone and fold over the end multiple times to seal.
- Line a baking tray with baking paper and lay out the chocolate flowers.
- Cut the tip off the piping bag 2mm in diameter and, using the pink white chocolate in the cone as glue, attach flowers to the cherry tree branches with the pink side facing up.
- Then, once attached, pipe a pink dot to decorate the centre of each flower.
- Pipe extra dots along the branches with the pink chocolate, to decorate, creating the look of emerging blossoms.
- Set aside in the fridge for plating.
Cherry Blossom Liquid Centres
- Combine the cherry blossom purée, morello cherry purée and sugar syrup into a blender and blitz on high.
- In a small bowl mix the sugar with the xanthan gum and add to the blender.
- Blend the mixture on the ‘mill’ setting for 7 minutes to activate the xanthan gum.
- Fill 2.5cm diameter silicone half sphere mould with the purée and hard freeze in the blast freezer until needed.
Vanilla Cheesecake
- In an stand mixer, whisk thickened cream (A) to firm peaks and set aside
- In a small bowl soak the gelatine leaves in iced cold water for a few minutes to soften, drain and discard the water and squeeze the excess from the soaked gelatine. Set aside.
- In a stand mixer, whisk the egg yolks.
- Meanwhile, in a small saucepan, add the water to the caster sugar (A) and bring to a boil to dissolve the sugar and make a syrup.
- While whisking, in a steady stream, gently pour the hot syrup down the inside of the bowl onto the yolks and whisk to cool and triple the volume.
- In a medium bowl use a spatula to hand beat the cream cheese to loosen, then add the caster sugar (B), cream (B) and vanilla seeds and mix through until smooth.
- In a small saucepan over low heat, warm the lemon juice, remove from the heat and stir in the softened gelatine to melt. Beat this mixture into the cream cheese until smooth.
- Using a spatula, fold the egg yolk mixture into the cream cheese mixture and then fold in the whipped cream (A). Transfer to a large piping bag and cut 3mm from the tip.
- Using a 4.5cm diameter dome shaped silicone mould, pipe the cheesecake mix to halfway, filling at least 2 cavities.
- Remove the Cherry Blossom Liquid Centres from the blast freezer, gently demould and place one insert into the centre of each cheesecake, with the rounded side facing down. Top off with cheesecake mix.
- Place in the blast freezer until needed.
Purple Glaze
- In a small bowl soak the gelatine leaves in iced cold water for a few minutes to soften, drain and discard the water and squeeze the excess from the soaked gelatine. Set aside.
- Place the white chocolate in a stick blender cannister.
- In a small saucepan on medium heat, bring the milk, glucose, and vanilla seeds to a boil, remove from the heat and add the soaked gelatine. Stir with a spatula to melt and dissolve before pouring onto the chocolate, use a stick blender to blend well. Add the grape colour and blend until a homogenous colour. Strain through a sieve and store in a jug at room temperature, stirring from time to time, until needed.
White Chocolate & Cherry Blossom Cream
- Place the white chocolate in a stick blender cannister.
- In a small saucepan over medium low heat, combine the cream and trimoline and heat to a simmer.
- Remove from the heat and pour onto the chocolate, emulsify fully using a handheld stick blender.
- Pour into a stand mixer bowl and store covered in the fridge for one hour (until required).
Cherry Jelly Spheres
- In a small bowl soak the gelatine leaves in iced cold water for a few minutes to soften. Drain and discard the water and squeeze the excess from the soaked gelatine. Set aside.
- In another small bowl add the agar to the sugar and mix well to combine.
- In a small saucepan add the purée, sugar/agar mix and water and bring to a gentle boil over medium low heat, stirring constantly.
- Remove from the heat and stir in the reserved gelatine.
- Strain the jelly through a small sieve into a small jug and pour the liquid into small 1cm diameter silicone sphere moulds. Place in the blast freezer until needed.
Cherries In Vanilla Syrup
- In a small saucepan over medium medium heat, add the sugar, vanilla and water and heat to a boil. Add the cherries and simmer for 2 minutes before removing from the heat and allowing to cool in the pan. Set aside at room temperature until required.
Miso Caramel
- In a small bowl soak the gelatine leaves in iced cold water for a few minutes to soften. Drain and discard the water and squeeze the excess from the soaked gelatine. Set aside.
- In a medium bowl lightly whisk together the eggs to combine and set aside.
- Placing the sugar in a medium saucepan over medium heat, make a direct caramel with the sugar. Meanwhile, in another small saucepan over medium high heat, separately heat the cream to a scald.
- Caramelise the sugar to an even deep brown colour.
- Being careful of splattering, deglaze the caramel with the scalded cream. Whisk together to temper.
- Then combine a small amount of the mixture with the lightly whisked eggs. Mix well and add all back to the medium saucepan, cook over a medium heat until 82°C.
- Remove from the heat and stir in the softened gelatine.
- Cool the salted caramel cream in a bowl over ice to a temperature of 40°C.
- Add the butter and miso to a stick blender cannister, then pour in the cooled salted caramel cream. Using a stick blender, mix until homogenous.
- With a small sieve strain the cream into a jug and pour onto a flat baking tray.
- Place in the freezer for approximately 1 hour or until set.
White Spider Glaze
- In a small bowl, mix the neutral glaze with enough titanium to turn the mixture white, adding a little water to achieve a paint-like consistency. Pour into a flat based container and set aside at room temperature until required.
Vanilla Cheesecake with Cherry Blossom Liquid Centre (continued)
Vanilla Cheesecake stone with Cherry Blossom Liquid Centre
Purple Glaze
White Spider Glaze
- Demould the cheesecakes onto a wire rack set over a tray and return to freezer.
- Using a heat gun and stirring if necessary, bring the purple glaze to 32°C-35°C.
- Line a small tray with baking paper. Remove cheesecakes from the blast freezer.
- Working one by one, pour the purple glaze over the frozen cheesecake then moving quickly before glaze is set, dip a small offset palet knife into the white spider glaze and paint a stroke across the glazed surface to make a spider web effect. Wipe the palet knife clean and repeat with remaining cheesecakes.
- Allow excess glaze to drip away and carefully move cheesecakes onto the clean baking paper lined tray and place in the fridge to defrost.
White Chocolate & Cherry Blossom Cream (continued)
- Remove White Chocolate & Cherry Blossom Cream from fridge, place in the bowl of a stand mixer with the whisk attachment and whisk in the cream.
- Whip to soft peaks from cold and gently using a knife, ripple in the cherry blossom flower purée.
- Transfer 1/3 to a small piping bag fitted with a small size 802 nozzle. Transfer remainder to a piping bag with a size 805 plain nozzle fitted and reserve in the fridge for plating.
Miso Caramel (continued)
- In the bowl of a stand mixer fitted with the whisk attachment, beat the miso caramel until firm peaks form.
- Transfer to a small piping bag fitted with a (small) size 802 plain nozzle fitted and set aside in the fridge for plating.
Plating the Cherry Blossom
Melted 54% chocolate at 31-32°C in a paper cone, keeping warm in the dehydrator
4 Chocolate Cherry hemispheres at room temperature
2 Purple and White Spider Glazed Cheesecakes
3 frozen Cherry Jelly Spheres, demoulded
Miso Caramel in small piping bag with small plain nozzle
Cherry Blossom Cream in a small piping bag with small 802 plain nozzle
Cherry Blossom Cream in a piping bag with larger 805 plain nozzle
3 x (2.5-3.5cm) torn pieces of Red Velvet Brownie at room temperature
2 Cherries in Vanilla Syrup
1 piped Chocolate Double Cherry Stem in the fridge
Cool Spray
3 Chocolate Cherry Tree Branches with Blossoms in the fridge
- Leave an unadorned border of approximately 1 inch around the plate.
- Using some melted chocolate at 31-32°C in a paper cone as ‘glue’, fix 2 chocolate cherry hemispheres cut side up to the top of the plate (12 O’Clock) with a gap of approximately 3mm.
- Forming a semi-circle in the top half of the plate, place one glazed glazed cheesecake at 11 O’Clock and one at 2 O’Clock.
- Starting at one end of semi-circle, pipe 4 bulbs of miso caramel evenly around the semi-circle.
- Pipe 1 large bulb (large nozzle) of cherry blossom cream next to each cheesecake.
- Pipe 3 small bulbs (small nozzle) of cherry blossom cream alternating around the semi-circle.
- Place 2 cherries in vanilla syrup on the plate (one next to each large bulb of cherry blossom cream).
- Add 3 pieces of red velvet brownie around the plate.
- Add 3 cherry jellies onto the serving plate, placing next to a a bulb of miso caramel.
- Using the small nozzle, pipe a filling of cherry blossom cream into the two fixed chocolate cherry hemispheres and cover with the two extra chocolate cherry hemispheres to form 2 spheres of chocolate cherries.
- Using a heat gun, warm the end of a small metal skewer and gently pierce a tiny hole at the top of each chocolate cherry. Using some more melted chocolate at 31-32°C in a paper cone as ‘glue’, place one piped chocolate cherry stem in the holes to join the cherries. Use Cool Spray to help fix.
- Using a small palette knife to gently remove from acetate, place 3 flowering cherry tree branches on top to garnish.