


Back
Mistique
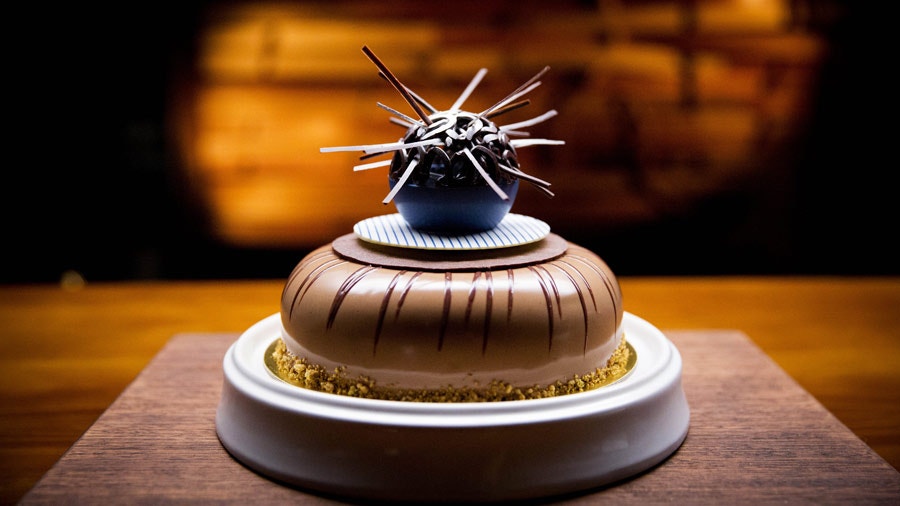

Recipe by Christy Tania
- Steps
- Ingredients
Ingredients
Vanilla Marshmallow
Passionfruit Curd
Vanilla Chocolate Cream
Orange Cocoa Sablé
Banana Milk Chocolate Brownie
Caramel Milk Chocolate Mousse
Roast Nuts with Salt
Neutral Glaze
Dark Glaze
Milk Chocolate Hazelnut Glaze
Striped White Chocolate Disc
Blue Chocolate Half Sphere
Tempered Chocolate Twigs
Tempered Chocolate Swirl Half Sphere
Garnish
Select All
Steps
- Preheat oven to 165C.
- For the Vanilla Marshmallow, first place gelatine into a small bowl of iced water and set aside to bloom.
- Meanwhile, make an Italian meringue by combining the sugar and water in a small saucepan over low heat, and stir until dissolved. Brush sides of saucepan down occasionally with a wet pastry brush to prevent the sugar crystallising. Increase heat to medium and continue to cook, without stirring, until sugar syrup reaches 140C.
- Meanwhile, place egg whites into a stand mixer fitted with a whisk attachment and whisk until soft peaks form. With the mixer running on medium speed, slowly add sugar syrup to the egg whites then turn mixer to high speed and whisk until thick and glossy.
- Squeeze out gelatine leaves to remove excess moisture and add the softened leaves to the meringue mixture. Whisk on high until gelatine has completely dissolved. Add scraped vanilla seeds to the meringue and continue whisking until mixture is completely cool. Transfer Vanilla Marshmallow to a piping bag.
- Pipe Vanilla Marshmallow into the base of the smaller silicone ring mould to ¼ full. Transfer to the blast chiller until marshmallow is firm.
- For the Passionfruit Curd, place all ingredients except for the butter into the Thermomix and set on speed 3.5 at 85C and blend for 4 minutes. Once at temperature, add in cold butter and blend until completely cold. Transfer curd to a piping bag.
- Remove mould with Vanilla Marshmallow from the blast chiller and pipe a layer of Passionfruit Curd on top of the layer of firm Vanilla Marshmallow until mould is ½ full. Smooth off the top of the curd layer and place back into the blast chiller until firm.
- For the Vanilla Chocolate Cream, place milk, cream, liquid glucose, vanilla pod and seeds into a small saucepan over low heat and stir until warm but not boiling.
- Meanwhile, melt dark chocolate in a bowl over a saucepan of simmering water until completely melted and smooth.
- Remove vanilla pod from the warm milk and cream mixture and discard. Pour the milk and cream mixture into the melted dark chocolate and use a stick blender to blitz until completely combined. Stir the mixture until completely cooled.
- Transfer cooled Vanilla Chocolate Cream to a piping bag. Remove mould with Vanilla Marshmallow and Passionfruit Curd layers from blast chiller and pipe a layer of Vanilla Chocolate Cream on top of the Passionfruit Curd until the mould is ¾ full. Smooth off the top of the Vanilla Chocolate Cream layer and place the mould back into the blast chiller until firm.
- For the Orange Cocoa Sablé, beat brown sugar, butter and orange zest in a stand mixer fitted with a paddle attachment until pale and creamy.
- Sift the remaining dry ingredients for the sablé into a separate bowl. Add 1/3 of the dry ingredients to the creamed butter and sugar and mix well until combined. Then add ½ of the eggs, mixing well again. Add another 1/3 of the dry ingredients, then the remaining eggs, followed by the remaining 1/3 of the dry ingredients, mixing well after each addition. Once all dry ingredients and eggs are added, mix until the mixture has come together to form a firm dough.
- Roll sablé between two pieces of baking paper to 2mm thick and trim to fit a baking tray 30cm x 40cm. Transfer dough, still between both layers of baking, paper onto the baking tray and transfer to the freezer until firm.
- Once sable is firm, remove from freezer and peel off the top layer of baking paper. Place an 18cm plastic ring stencil on to the dough and, using the tip of a small knife, cut around the outside of the stencil to make a disc. Next, place the 12cm plastic ring stencil on to the dough and cut around the outside to make a second disc. Then, using a 7.5cm ring cutter, cut a third disc.
- Use a ruler to measure the diameter of each disc and mark a mid-point. Using a 4.5cm ring cutter, use the midpoint mark as a guide to cut a hole into the centre of the 7.5cm and 12cm sablé discs. Use a 6cm cutter to cut a hole into the centre of the 18cm disc. Carefully remove the inner discs of each ring and all the surrounding edges of sablé to be left with three rings. Place the baking tray with the discs into the preheated oven and bake for 12 minutes. Remove from oven and set aside to cool until required.
- For the Banana Milk Chocolate Brownie, line a ½ sized gastro tray with baking paper.
- Place chocolate in a bowl over a saucepan of simmering water and stir occasionally, until completely melted.
- Place butter, caster sugar and muscovado sugar together in the bowl of a stand mixer fitted with a paddle attachment. Cream the mixture until pale and creamy. Add remaining dry ingredients and mix well to combine. Mix in the eggs, one at a time, until combined.
- Add melted chocolate into the mixture, add ripe banana pieces and mix until completely combined. Some banana lump will remain. Spread Brownie mixture onto pre-lined ½ sized gastro tray and spread to 1cm thick, using a spatula to smooth the surface. Place into the oven until skewer comes out clean, about 20-22 minutes.
- Once cooked, remove from oven and turn out onto a cooling rack. Place into the blast chiller until cold.
- Once cold, Place the 16cm ring stencil on to the surface of the Brownie and, using the tip of a small knife, cut around the outside and the inside of the stencil to make a ring shape. Carefully lift off the inside disc and surrounding trimmings to be left with a ring of Banana Milk Chocolate Brownie on the gastro tray.
- Remove filled silicone ring mould from blast chiller. Place Brownie ring on top of the Vanilla Chocolate Cream layer and press down gently. Return the mould to the blast chiller until required.
- For the Caramel Milk Chocolate Mousse, first make a dry caramel by placing caster sugar into a small frypan over medium heat and cook until sugar has melted and caramel reaches a dark amber colour. Remove from heat immediately to prevent caramel burning.
- Meanwhile, place 150g of the cream into a small saucepan over low heat until warm.
- Once sugar has reached desired colour, remove from heat and whisk in the warm cream to deglaze the pan. Whisk until thoroughly combined.
- Place caramel cream and egg yolks into Thermomix at 85C, speed 3 and blitz until smooth, about 30 seconds, to make an anglaise.
- Meanwhile, melt chocolate in a medium sized bowl over a saucepan of simmering water until completely melted. Fold the caramel anglaise into the melted chocolate.
- Whip the remaining cream to soft peaks and fold gently through the chocolate mixture. Transfer chocolate mixture to a piping bag. Pipe into the larger silicone ring mould to halfway full.
- Remove the smaller ring mould from the blast chiller and de-mould. It should be completely frozen. Gently push frozen insert ring, Vanilla Marshmallow side down, into the larger ring mould filled with Caramel Milk Chocolate Mousse, allowing Mousse to push up the sides of the smaller insert. Level off the mouse with a spatula.
- Pipe more mousse to completely fill the ring mould and level off. Place largest Orange Cocoa Sable disc on top, push down gently, then transfer to the blast chiller until required.
- For the Roast Nuts with Salt, line a baking tray with baking paper. Spread nuts over the lined tray and bake until golden, about 8-10 minutes. Remove from oven, sprinkle with salt and set aside to cool. Once completely cool, place into the bar blender and blitz to a coarse crumb.
- Transfer nut crumbs to a bowl, add gold dust and stir through to coat nuts evenly. Set aside on the bench until required.
- For the Neutral Glaze, place 100g of the sugar in a bowl and stir in the pectin. Set aside until required.
- In a medium saucepan, combine water, vanilla and remaining sugar and bring to the boil. Once boiling, stir in remaining sugar and pectin mix and continue to boil for a further 2-3 minutes. Remove from heat and add lemon juice, strain mixture through a fine sieve and set aside to cool.
- For the Dark Glaze, place cream into a small saucepan over low heat until warm. Add 150g of the Neutral Glaze and mix in the cocoa powder. Using a hand blender, blitz until cocoa is fully dissolved. Transfer the mixture to a piping bag and set aside on the bench, keeping warm until required.
- For the Milk Chocolate and Hazelnut Glaze, place gelatine into a small bowl of iced water and set aside to bloom.
- Place all remaining ingredients into the Thermomix. Once gelatine has softened, squeeze out excess moisture and add the softened leaves to the Thermomix. Process on Speed 3 at 50C until smooth and fully combined. Turn Thermomix temperature down to 40C, and speed down to 1. Set the Glaze aside in the Thermomix on the bench, maintaining set speed and temperature until required.
- For the Striped White Chocolate Disc, first prepare a sheet of blue striped transfer by laying sheet flat on a small cutting board on the bench, with the coloured, shiny side facing down.
- Place 800g of the white chocolate into a medium sized bowl and melt over a saucepan of simmering water until chocolate temperature reaches 45C.
- Remove bowl from heat, add remaining white chocolate and cool to 29C. Once at temperature, pour some of the white chocolate onto the prepared sheet of transfer, reserving the remaining chocolate for the Blue Chocolate Half Sphere. Smooth the chocolate on the transfer sheet to 2mm thick. Allow to set slightly then, using a 10.5cm disc cutter, cut out a disc of striped white chocolate.
- Use a ruler to measure the diameter of the striped disc and mark a mid-point. Using a 4.5cm ring cutter, use the midpoint mark as a guide to cut a hole into the centre of the striped disc. Cover the white chocolate sheet with baking paper and place a cutting board on top to weigh down. Set aside in the fridge until required.
- To make the Blue Chocolate Half Sphere, place bowl with remaining tempered white chocolate back over the saucepan of simmering water and bring to 33-35C.
- Remove from heat and pour 450g of the remaining tempered white chocolate into a stick blender canister. Add the blue powdered colouring and, using a stick blender, blitz until colour is completely incorporated. Transfer to a bowl and stir to bring down to 27C.
- Once at temperature, pour the blue chocolate into one tray of dome moulds and fill to the top. Tip dome mould upside down to allow excess chocolate to drip away. Level off with a scraper then place, face down, onto a baking tray lined with baking paper and place into the blast chiller until required.
- For the Tempered Dark Chocolate Twigs, place 600g of the dark chocolate over a saucepan of simmering water and bring to 45-50C. Remove from heat, add remaining 100g of dark chocolate and stir to bring temperature down to 29C.
- Once at temperature, spread some of the chocolate to 2mm thick on acetate sheet. Leave aside until chocolate turns matte. Use comb to scrape over the chocolate to create thin strips and set aside on the bench to set. Leave remaining bowl of tempered chocolate aside to cool to 26C in preparation for the Tempered Chocolate Swirl Half Sphere.
- Once Dark Chocolate reaches 26C, transfer to a piping bag.
- For the Tempered Chocolate Swirl Half Sphere, snip piping bag of reserved tempered chocolate and pipe swirls into the second tray of dome moulds to create a random, lacy pattern. Ensure the web of chocolate overlaps in places to create a stable dome structure. Level off edges with a scraper. Place into the blast chiller until required.
- In preparation to glaze the frozen ring, place 4 identical metal cylinders in the middle of a cooling rack and sit on a baking tray.
- To assemble the Mystique, remove silicone ring mould from blast chiller, de-mould frozen chocolate mousse ring and sit onto the metal rings on the prepared tray.
- Pour Milk Chocolate Hazelnut Glaze over frozen ring to coat completely. Allow the excess glaze to drip off the edges. Use a metal offset spatula to cut away the drips from the edges of the ring.
- Next, snip the tip off the Dark Glaze piping bag and, working quickly, pipe zig-zag stripes, in a back and fourth motion, around the glazed ring.
- Use a metal spatula to clean the excess Dark Glaze from the edges of the ring then carefully transfer glazed ring to the gold cake board using a large spatula.
- Gently press the Roast Nuts with Salt around the edge of the glazed ring to about 1cm high. Run fingertip around the base of the ring to clean excess nuts around the edge, leaving a border of the gold cake board exposed.
- Carefully place the glazed ring on the cake board onto the white serving base.
- Place the middle-sized ring of Orange Cocoa Sablé on top of the glazed ring so the hole lines up with the centre hole of the glazed ring. Sit smallest ring of Orange Cocoa Sablé on top of the middle-sized ring of Orange Cocoa Sable, then top with the Striped White Chocolate Disc, ensuring all centre holes line up.
- Sit shot glass inside the centre hole of the Striped White Chocolate Disc.
- De-mould Blue Chocolate Half Sphere by gently tapping mould, upside down on the bench, to release the blue half sphere. Holding a 4.5cm ring cutter with tweezers, carefully heat the cutter edge with a blow torch. Gently push heated ring all the way through the base of the Blue Chocolate Half Sphere to create a hole.
- Sit Blue Chocolate Half Sphere, hole side down, over the shot glass on top of the Striped White Chocolate Disc, ensuring all holes line up.
- De-mould Tempered Chocolate Swirl Half Sphere and place on top of the Blue Chocolate Half Sphere to create a complete sphere.
- Carefully bend the acetate sheet to release the Tempered Chocolate Twigs from the acetate. Thread the Twigs through the Tempered Chocolate Swirl Half Sphere in a random, diagonal arrangement.
- Add a sprinkle of gold dust on top of the Tempered Chocolate Twigs and Tempered Chocolate Swirl Half Sphere.
To serve:
- Remove the Tempered Chocolate Swirl Half Sphere and carefully half fill the shot glass with dry ice. Use a syringe to carefully drop hot water onto the dry ice pellets, filling the shot glass to create a vapour, being careful not to wet the cake.
- Place Tempered Chocolate Swirl Half Sphere back on top, carefully cover with glass terrarium dome and transfer to table. Serve immediately.