Back
All Eyes On Me

- Steps
- Ingredients
Ingredients
Chocolate Cremeux
Vanilla Cream
Chocolate Genoise
Cherry Jam
Cake Assembly
Chocolate Structure
White Chocolate Spray
Select All
Steps
- Heat the oven to 175°C.
- Prechill a blast freezer to -40°C.
Chocolate Cremeux
- For the Chocolate Cremeux, bloom the gelatine in a bowl of cold water
- In a Thermomix jug, combine the milk, cream, vanilla, yolks and sugar. Cook for 7 minutes, 85°C, speed 3.
- Squeeze excess water from the gelatine sheets and add to the jug with the dark chocolate. Blend 10 seconds, speed 4, or until the chocolate has melted and emulsified.
- Pour into at least two cavities of a 7cm diameter cylinder silicon mould, filling to a thickness of 15mm and place in the freezer until frozen.
Vanilla Cream
- For the Vanilla Cream, bloom the gelatine in a bowl of cold water.
- In a Thermomix bowl, combine milk, vanilla, sugar, cornflour and yolks. Cook for 6 minutes, 85°C, speed 3.
- Squeeze excess water from the bloomed gelatine and add to the bowl. Mix for 10 seconds, speed 4.
- Pour mixture into a baking tray and allow to cool down for 15 minutes in the freezer until 40°C. Transfer back into a large mixing bowl.
- When cool, place cream into the bowl of a stand mixer, fitted with a whisk attachment. Whip the cream until soft peaks. Using a spatula, add the anglaise mixture and fold gently. Transfer to a piping bag fitted with a 1cm star nozzle and place in the fridge for at least 1 hour.
Chocolate Genoise
- For the Chocolate Genoise, place the egg yolk and sugar(a) in the bowl of a stand mixer fitted with a whisk attachment. Whip until pale and creamy.
- In another stand mixer bowl fitted with a whisk attachment, whip egg whites and sugar(b) to stiff peaks and doubled in volume; being careful not to over-whip
- Sift a third of the dry ingredients into the yolk mixture and carefully fold using a spatula.
- Add a third of the meringue and carefully fold using a spatula.
- Repeat the previous two steps until all the ingredients are combined.
- Add the melted butter and fold gently.
- Spread evenly onto a 325mm x 325mm silicone mat frame. Bake for 22-25 minutes.
- Allow to cool completely before cutting three 10 cm diameter discs.
Cherry Jam
- To make the Cherry Jam, combine the cherries, puree, vanilla and sugar (a) in the Thermomix jug. Heat for 4 minutes, 100°C, speed 3
- In a small bowl mix the pectin NH with sugar (b). Incorporate into the hot mixture once it reaches 100°C and then mix for a further 2 minutes at 105°C, speed 3.
- Allow to cool slightly then transfer to a piping bag. Set aside.
Cake Assembly
- To assemble the cake, line the base of two 10cm diameter cake tins with acetate then line the sides, ensuring the acetate is 15cm high in one of the tins.
- Place the cherry liquid into a squeeze bottle.
- Place first chocolate Genoise sponge disc at the bottom of the tin lined with deeper acetate. With a fork, prick the sponge evenly all over. Pour some cherry syrup onto the sponge until well soaked.
- Pipe a ring of vanilla cream around the outer edges of the sponge to form a dam then pipe cherry jam into the centre of the dam.
- Unmould the chocolate cremeux from the freezer and place in the middle of the sponge.
- Pipe a thin layer of vanilla cream to cover the cremeux until it is flush and even.
- Place another sponge disc on top and repeat the previous four steps.
- Place the final sponge on top and soak it with syrup then pipe a layer of vanilla cream on top.
- Pipe rosettes around the perimeter of the cake and then pipe a layer of cherry jam in the centre. Freeze the cake for 1 hour to set the cream.
- Meanwhile, temper the chocolate in a microwave-safe bowl, melting it in the microwave in 15-30 second increments until it is half melted. Stir vigorously until all the chocolate melts. If you have some resistant chocolate, you can use a heat gun to briefly and gently warm the chocolate while stirring.
- Stir until the temperature of the chocolate reduces to 31-32°C.
- Pour a 20mm layer of chocolate into the remaining cake tin. Place in the freezer to set.
- To create the chocolate cigarette rolls for garnish, spread the remaining chocolate onto a flat stainless steel tray or a marble board. Wait few minutes until semi-set.
- Using scraper, scrape the chocolate towards yourself to form thick chocolate cigarette rolls. Set aside.
- When the cake is set, remove from the tin and remove the acetate. Remove the chocolate slab from the other tin and place the cake onto the chocolate slab. Set aside in the fridge until ready to serve.
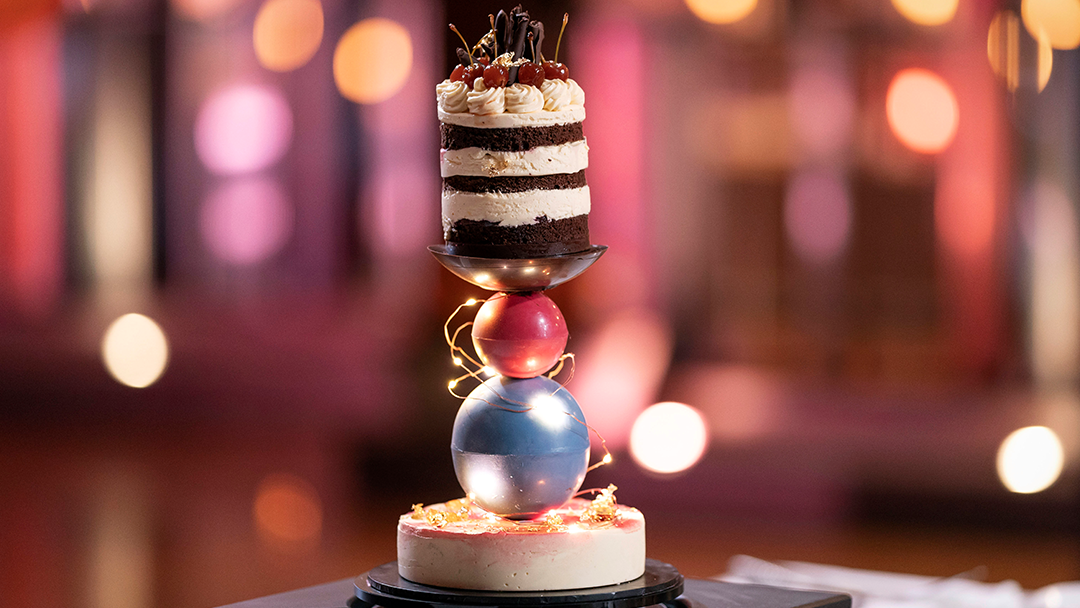
- When ready to serve, decorate the cake with the candied cherries on top of the piped rosettes and place the chocolate cigarette rolls in the middle. Garnish with gold leaves.
- Note: the chocolate slab is to transfer the cake easily to the white chocolate structure. If not doing this the slab can be eliminated from the cake construction.
Chocolate Structure
- To make the Chocolate Structure, prechill a blast freezer to -40°C.
- Prepare the following moulds; a 20cm diameter cylinder silicon cake mould, two 10cm polycarbonate dome moulds, two 7cm polycarbonate dome moulds, a 13.5cm silicon dome mould.
- Select a 2cm diameter pvc pipe, 23cm in length. Line with acetate and seal one end with sticky tape.
- Prepare a 7cm diameter florist foam donut that is 3cm high. Cover with two layers of cling wrap, placing the excess wrap into the centre of the donut.
- Select a paper straw. Select a fairy light with battery.
- Temper the dark chocolate by placing in a microwave-safe bowl and melting in the microwave at 15-30 second increments until it is half melted. Stir it vigorously until all the chocolate melts. If you have some resistant chocolate, you can use a heat gun to briefly and gently warm the chocolate while stirring.
- Stir the chocolate until the temperature reduces to 31%.
- To make the centre rod of the structure, take the pvc pipe and fill it with dark chocolate. Hold upright for 1-2 minutes until it is semi set then place into the blast freezer to set for 30 minutes.
- With the remaining chocolate, fill the 13.5cm dome mould to a depth of 4cm. Allow to set for 10 minutes then transfer to the blast freezer until required.
- Temper 300g the white chocolate by placing in a plastic bowl and melting in the microwave at 15-30 second increments until it is half melted. Stir it vigorously until all the chocolate melts. If you have some resistant chocolate, you can use a heat gun to briefly and gently warm the chocolate while stirring.
- Stir the chocolate until the temperature reduces to 29°C.
- Portion off 100g of the chocolate and add the blue colouring. Mixing well until the desired colour is achieved.
- Pour the chocolate into two cavities of the 10cm dome moulds. Allow to sit for 60-90 seconds then turn the mould upside down over the bowl of chocolate and allow to drain until the drips stop. Using a dough scraper, scrape the excess chocolate from the rim of the moulds then place with the open side down onto a lined tray.
- Repeat by colouring another 100g of chocolate with the red colour and fill two cavities of the 7cm moulds.
- Allow both to set for 15 minutes before placing in the blast freezer until required.
- When the chocolate in the pvc pipe has set, temper the remaining white chocolate as above.
- Prepare the 20cm cylinder mould on a tray. Carefully, remove the chocolate rod from the pvc and acetate. Position the centre chocolate rod in the centre of the mould. Position the foam donut to the left.
- Remove the rod and holding the foam to secure on the base of the mould, pour a 1cm layer of the chocolate into the mould. Quickly reposition the rod into the centre again and place the straw on the right. An extra set of hands is helpful here.
- Allow to set, using freeze spray to secure. It is important that the florist foam and straw are touching the base of the mould.
- When set enough to keep the objects in place, pour the remaining chocolate in to fill the mould. Ensure that the surface of the mould is very smooth, that the rod straight and in the centre of the mould. Hold all in place until semi-set. Use freeze spray if necessary.
- When semi-set, transfer to the blast freezer for 1 hour.
- To assemble the structure and decorate, carefully unmould the cylinder when set, taking care with the rod as it is delicate.
- Remove the florist foam donut from the bottom of the chocolate cylinder, using a heated knife if necessary and taking care not to tear the cling wrap.
- Insert the battery case of the lights in the cavity created and thread the wire up through the straw cavity to the top of the cylinder chocolate base. Trim the straw.
White Chocolate Spray
- Prepare the White Chocolate Spay by combining the cocoa butter and white chocolate together in a microwave-safe bowl and melting in 15-30 second increments until completely melted. Add the red colour until the desired colour and stir to combine before pouring into the base of a paint gun.
- Spray the top of the cylinder base with three red stripes.
- To assemble the structure, place the chocolate base onto a serving board ready for assembly.
- Unmould the 7cm and 10cm domes. Heat the base of a clean saucepan and place the edges of one of the 10cm domes onto the hot base to melt the chocolate. Repeat with the other dome and quickly join them together to create a sphere. Use a small knife to smooth out the joining seam.
- Repeat with the 7cm domes.
- Warm the saucepan up again and place the end of a 2cm ring cutter onto the warm base to heat the cutter. Insert the cutter into the top of the 10cm dome so that the chocolate melts and a small cavity is created. Repeat on the other end of the sphere, directly opposite.
- Carefully, thread the sphere onto the chocolate rod. Repeat with the 7cm sphere.
- Unmould the dark chocolate dome. With the dome side facing up use the hot 2cm ring cutter to create a cavity that the chocolate rod will sit inside. The cavity needs to be 2cm deep.
- Melt a small amount of dark chocolate and pour into the cavity of the dome to act as a glue. Place the dome on top of the rod, ensuring it is straight and hold until set. Allow to set a further 20 minutes before placing the cake on top.
- Thread the fairy lights around the spheres and garnish the base with gold leaf.
- Place the cake on top of the chocolate structure and serve.


